There are two ways you can set up email reminders with Manychat.
The first way is if you already have an email marketing system. Then you can link Manychat’s data with your own email marketing software’s data via Zapier.
If you use Mailchimp, Manychat does have a direct integration with Mailchimp, but it only shares the email address and no other information. If we only have email addresses and no other data, we cannot send the correct reminder messages to the correct people because there will be no differentiator between the email addresses recorded from Manychat and the email addresses you have recorded from other sources.That doesn’t really help us much if we don’t have the full data. So we have to use Zapier when it comes to integration Mailchimp with Manychat too.
The second way to implement email reminders is to send emails straight from Manychat.
Which one is right for you? You can find out here.
Factors:
- Pricing – manychat charges per email. If you already have an email marketing software, all you have to do is pay for zapier
Math
Mailerlite – https://www.mailerlite.com/pricing – $10 for 1000 subscribers, $15 for 2,500 subscribers, $30 for 5000 subscribers.
$10 – 1000 people of unlimited coupons each
$15 – 2,500 people of unlimited coupons each
PLUS
Integromat – https://www.integromat.com/en/pricing – $9 per 10,000 tags – $29 per 40,000 tags, each coupon has max 5 tags
$9 – 2,000 coupons
$29 – 8,000 coupons
OR
Manychat – $0.003 cent per email, $3 for 1000 emails. If you send 5 reminders per person per offer, you can only handle a 200ish full coupon reminder sets per $3
$3 – 200
$10 – 666 people of 1 coupon each
$15 – 1000 people of 1 coupon each
So if you send 5 email reminders per person per coupon (recommended) and get 1000 signups in your first month (easily), it’s already worth it to go with an email marketing system asap.
If you plan on integrating your email marketing system, I will tell you where you can connect it. Then I will continue on and also show you how to send emails via Manychat.
Let’s go into our {Offer Name} Email Reminder flow.
In this flow, we want to accomplish 2 things:
- Make sure we have the person’s preferred email address for receiving email reminders
- Send reminder emails to that email address every x days, and only if they haven’t used the offer or if the offer didn’t expire. You can choose how many days apart you send your emails.
Beginning and end (overview) of this flow/stage/checkpoint
We also want to know how the person will be starting this flow and how the person will be ending this flow.
Someone can usually only get into this flow if you redirect them when they press a button or a quick reply button from a message.
For instance, in the previous flow we built (the reminder flow), we gave options to set up email reminders and led the conversation to go into this flow if they chose email reminders.

This flow will end when all the email reminders are complete. But each email reminder will have a link or button that goes back to the coupon flow.

Let’s start building the flow from beginning to end now!
Enabling Email Sending
One thing you also have to make sure of is that you have email sending turned on in Manychat.
You can do that in Settings > Email. Then make sure that your Email Channel is enabled. Input your sender’s name and reply-to email.
You should definitely turn off ManyChat Branding because it adds an extra image to your email, which risks the email not being received by the recipient.
Building the flow
The very first step we want to take in this flow is to check if we have the person’s email address.
Let’s create a conditions step after the starting step to check if the person’s email field has any value.
Click and hold the open gray circle from the starting step then drag and release in an empty area to open a list of possible next steps. Choose + Conditions.

Click on the Conditions box to open the conditions editor on the left side. Click on the + Condition button to add a condition.

Select “Email” in the list of conditions. Then select “has any value.”


If their email field does not have any value, which means that we do not have it, then we will ask them to input their email address.

Let’s continue the red part of the condition step to a new message that will ask the user to input their email address.
Click and hold the open red circle then drag and release in an empty area to open up a list of possible next steps. Choose ‘+ Send Message.’

We need to have a User Input message in this Message box. By default, the Message box creates a standard message. Click on the ‘+User Input’ button in the list of message options on the bottom of the Message editor.
Then hover over the default text message and click on the ‘X’ to delete it.
In the User Input message, let’s ask the person to enter their best email address to send email reminders to:
What is the best email address to send email reminders to?

After you are done typing the User Input message, more options will pop up and ask you what kind of reply you expect. Select ‘Email’ and make sure the ‘Save Email to System Field’ is ticked green. Ticking this green to ensure that the email address entered by the person will also get saved to their profile in your Manychat system.

Scroll down to the bottom of the same options box to see settings for retrying the message if the person’s answer is incorrect or formatted incorrectly. I usually leave this as default.

When the person inputs their email address, we want to record that email in our Google Sheets Restaurant CRM.
Click and hold the ‘Action on reply’ open yellow circle then drag and release in an empty area to open up a list of possible next steps. Select ‘+ Actions’ to start an Action step. The Action step editor will automatically appear on the left side. Click on ‘+ Action’ to add an action in this Actions step. Select ‘Google Sheets’ actions. Then click on ‘Select action’ to choose how this action interacts with your Google Sheets file.

A new popup box will appear asking how you want to write data to Google Sheets. For this specific action (recording an email address) we want to match it to the User Id of the person, so let’s choose ‘Update Row.’

Then you will get to select which Google Sheet file/tab to write to as well as what data will be used to match and Update a specific row.

After selecting those options, you will get to choose what data gets written to which column in the Google Sheets Restaurant CRM. To record the email address in the correct column, I went to the ‘Email X’ column where X is the #th offer you are recording right now. Then I placed the Email data in that column.

We want to continue the experience for your customer by adding a next message that will confirm we got their email address.
Before we can send them any emails, though, we have to get their permission to send them emails and set their Manychat profile status to ‘Email Opt-In.’ That’s how Manychat knows if we got permission from the user to send them emails.
So let’s continue by sending a message that confirms we got their email address as well as asks for their permission to send them emails.
Click and hold the open gray circle next to ‘Next Step’ then drag and release in an empty area to open up a list of possible next steps. Choose ‘+ Send Message.’
In the message, I write:
Thank you! Do we have permission to send you an email reminder?
Then I give them the option to respond Yes or No through quick reply buttons.

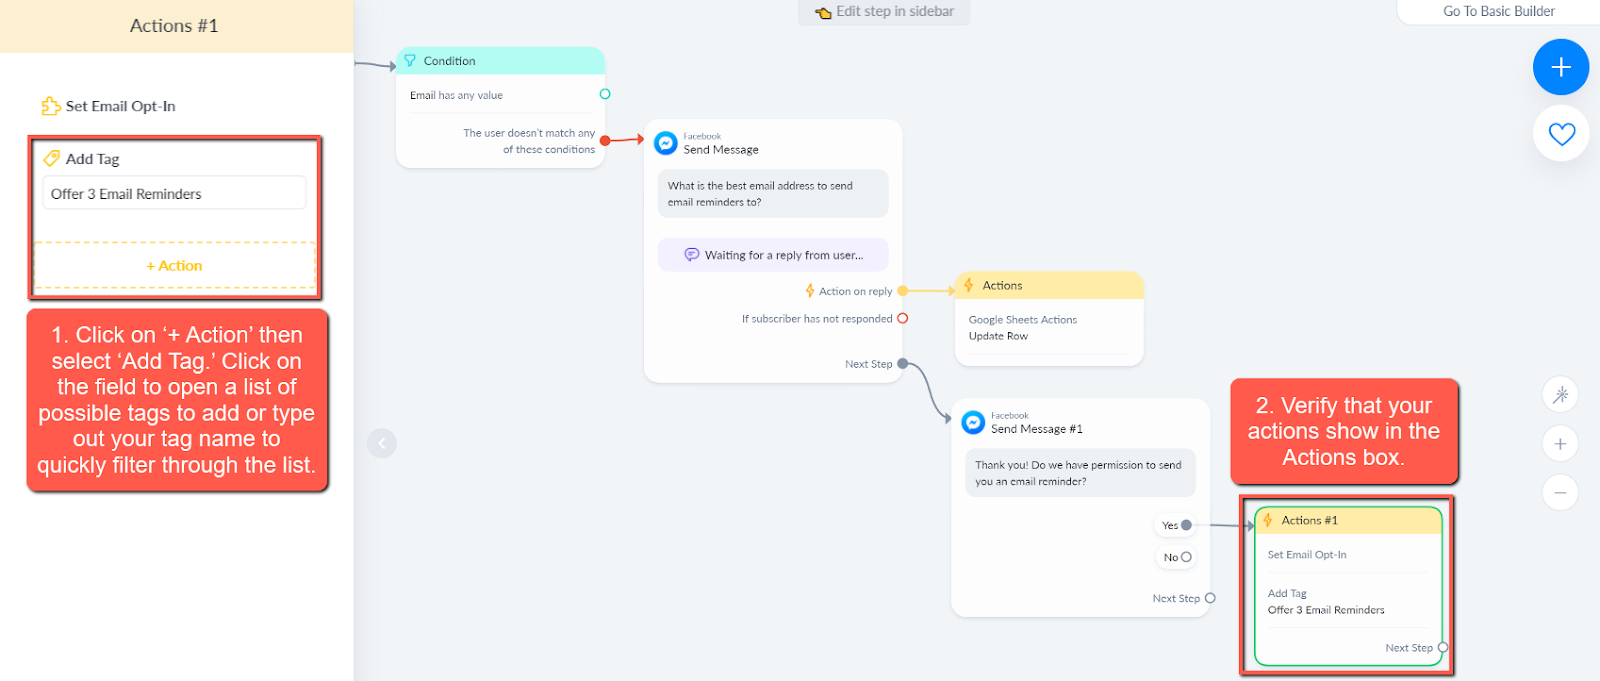
If they respond Yes, then I will set the user’s status as Email Opt-In. I will also tag them with ‘{Offer Name] Email Reminders’ so we know that they have already signed up for reminders regarding this specific offer.
To do that, click and hold the open gray circle next to the ‘Yes’ quick reply then drag and release in an empty area to open up a list of possible next steps. Choose ‘+ Action’ to continue to an Action step.

Then click on ‘+ Action to choose which action you want to occur. In the list of actions, choose ‘Set Email Opt-In’ to set the user’s status as opted in to email.
In the same conditions box, add another action that will tag the user with ‘{Offer Name} Email Reminders.’ Click on ‘+ Action’ then select ‘Add Tag.’ Click on the field to open a list of possible tags to add or type out your tag name to quickly filter through the list.
After this Actions step, we’re going to send them their first email!
Click and hold the open gray circle next to ‘Next Step’ then drag and release in an empty area to open up a list of possible next steps. Choose ‘Send Email.’

We’re going to leave this email the way it is and come back to it. You’ll see why I left it for later. It will be a much easier process.
Let’s go back to the ‘Email has any value’ condition step where we didn’t connect the open green circle to a next step.
The green circle means that we do have data in the user’s Email field. That means we have some kind of email address, but we can’t be sure that it is the email address that they prefer receiving reminder emails to.
So let’s continue the open green circle to a message that tells them which email address we have in our records and asks them if that is the email address they prefer to receive reminders for.
Click and hold the open green circle then drag and release in an empty area to open up a list of possible next steps. Choose ‘+ Send Message.’ Type a message that presents their email address we have on file and asks them if that is the email address they prefer to use to receive email reminders about this offer. I use the following message:
We have your email address from previous records. Is this the right email address to email reminders to?
{{email}}
Then give them the option of replying ‘Yes’ or ‘No’ by creating a ‘Yes’ quick reply button and a ‘No’ quick reply button. If the user says Yes, let’s continue their email reminder signup. If no, let’s ask them for the email address that they prefer.

You might have realized that we already have created the next steps that we want after the user clicks on ‘Yes’ or ‘No’ quick replies.
The ‘Yes’ quick reply needs to go to a Thank You message which also asks for their permission to send emails to their preferred email address.
The ‘No” quick reply needs to then ask them to input their preferred email address for receiving reminder emails.
Sound familiar?
The ‘Yes’ can continue to the Send Message action we made before which thanks the user for inputting their email address and then asks for their permission to send emails to the email address.
The ‘No’ can continue towards our User Input message where we ask for the user’s email address. Before end up at that message, it should first continue towards a message that smoothly transitions from the user realizing we have an incorrect email address and then asking the user to update it.
Let me jog your memory by showing you.

Once you have the ‘Yes’ and ‘No’ quick replies connected to the correct next steps, let’s go back to the first email message.
If their email address does have a value, we will present the email address to them in a message and ask them to confirm the email address that we have in our records. If they confirm that the email address we have is correct, then we can continue the signup process.
If we don’t have their email address, we will ask them to input their email address.
You may think that it is unnecessary to implement this step. You are correct if you are thinking about the present since we require all people to give us their email address upon offer signup. However, if you want to futureproof your work and possible scale towards phone number signups instead, this step will eliminate any future work.
In most cases, we should already have their email address from when they signed up for the coupon.
We want to check one more condition – if they are already signup for email reminders. After
Once we have the correct email address, we want to start sending the email reminders.
After we confirm that we have the correct email address, we want to start sending the emails right away.
Connect the email confirmation message to a Send Email action.
Click on the Send Email box to open the email editor on the left side.
In the email editor, you will see a couple of fields that you need to fill out in order to successfully send an offer reminder email.

In your Send Email action, you have to fill out 5 different fields to send a complete emaill:
- Subject
- Preheader
- Sender Name
- Edit Design
- Links
When someone receives your email, this is where each field will show:
The sender name is on the very left. The subject line shows afterwards. Any remaining space will show the Preheader or the beginning of the email design.
It’s important that people recognize you as a sender and that subject that you are sending them an email about, or else they will be cautious about opening it.
If they recognize both, they will open it because they expected it, know what it is about and are confident that they need to do something with it.
Since they signed up for this email reminder themselves, they will definitely be looking out for it. Our job is to write a Sender Name, Subject, and Preheader that they will recognize and be relevant to what they signed up for.
Here is what I usually put in each section to make the email recognizable for the customer:
Sender Name: {Name of Business that shows on the Facebook Messages or Facebook Page}
Subject: Your {Offer Name} is Here, {First Name}!
This is very straightforward and let’s them know that the item they just requested in their email inbox… is now in their email inbox!
Preheader: See Details Inside
After you enter your details for those fields, it’s now time to design the email. Don’t be intimidated when I say design. You don’t need any design skills for this and I am going to guide you through the whole process.
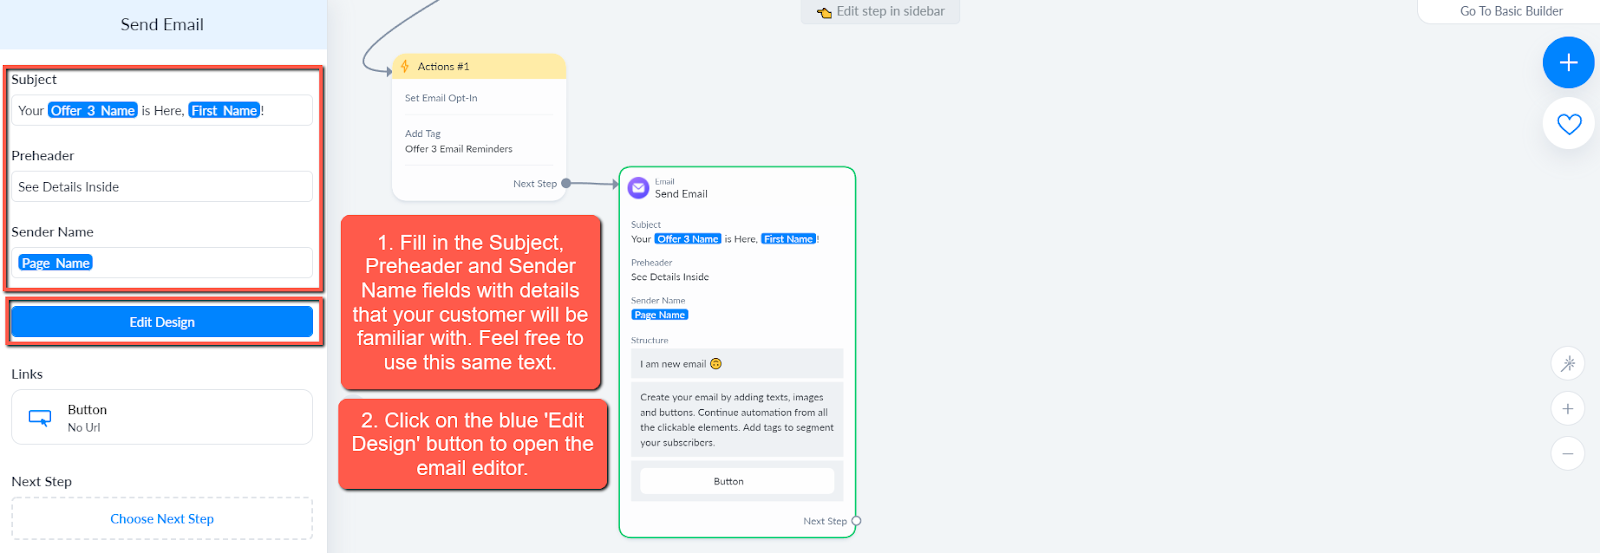
Click on the blue ‘Edit Design’ button to open the email editor. A new page will show that will easily help you build your email in a WYSIWYG (what you see is what you get) format. So whatever you see here is exactly what your customer will see when they open the email.
We are going to use the same elements they have by default and just change the wording. The wording will also be very familiar to you and the customer too!

In the top most text field with larger and bold text, let’s put the same text as we did in the Subject.
In the next text field with smaller and normal text, let’s put the coupon details. You can get the coupon details from your coupon text in your Coupon flow
For the button, let’s make it say “View Coupon” so that it is a clear call to action. Then let’s link it back to the coupon flow.

When you are done writing your email, click on ‘Close Email Builder’ to exit the email and return back to your flow.
You will see that the step continuing from the ‘View Coupon’ button within your email is a Start Flow step. Click on the flow step to select your ‘{Offer Name} Coupon’ flow.

This will not serve as the coupon itself so make sure you make it clear that the person has to view the coupon (by visiting the coupon flow) in order to actually use the coupon.
You just wrote your first email and I hope it was much easier than you thought!
Now we want to make it a sequence. But before we do, we also want to implement some conditions so that the emails don’t send if the offer is marked as validated or expired.
If you remember from our {Offer Name} Reminders flow where we set up the Facebook reminders, we were able to send only if the offer was not used or not expired by implementing a conditions step before an action.
So let’s create a conditions step after the email to check if the offer has been validated or is past the expiration date.
Click and hold the open gray circle next to ‘Next Step’ then drag and release in an empty area to open up a list of possible next steps. Choose ‘+ Condition.’

Add a condition and choose ‘Tag.’ Then choose isn’t and then choose your ‘{Offer Name} Validated’ tag.
Add another condition and choose ‘Current time.’ Then choose ‘before’ and set the type to ‘Custom field date.’ Choose your ‘{Offer Name} Signup’ Custom Field and offset it by + 14 Days. This condition will check if the offer is past the expiration period of 14 days or not.
To clear up what the green circle means and what the red circle means in the conditions box:

The green represents that the offer isn’t validated and isn’t expired. The red represents that the offer is validated or is expired.
Let’s continue the red circle to the ‘{Offer Name] Coupon’ flow which will take care of the expired or validated messaging for us.
Click and hold the open red circle then drag and release on top of the ‘{Offer Name}’ Coupon flow step that you already have from before.

Now that you have taken care of the red circle in the conditions step, let’s take care of the green circle! The green circle should continue to the next email in the email reminder sequence. This time, instead of creating a new email, we are going to copy the email we already have and paste it as the next step. This will save you a lot of time!

Click on the Send Email step. When you hover over it, you should see a copy symbol. You can click that to make a copy. An alternative would be to press Ctrl + C on your keyboard to copy, then Ctrl + V on your keyboard to paste.

After your pasted email shows up, connect the open green circle from the conditions step to the newly pasted email.
In case you were wondering, we are not going to send the same exact email twice. They will be similar but we will still be making edits to this newly pasted email, which will end up being the 2nd email in this email reminder sequence!
Click on the newly pasted Send Email action to open the email editor on the left side.
Let’s switch up the Subject and Preheader, but leave the Sender Name the same.
For the Subject and Preheader, let’s say something relevant to this specific email. For example, this is the first actual reminder we are sending to them (the first email was more of a test than a reminder). So we can say “Here’s The Reminder You Requested, {First Name}!” for the Subject. Then we can say “How To Access Your {Offer Name}” for the Preheader.
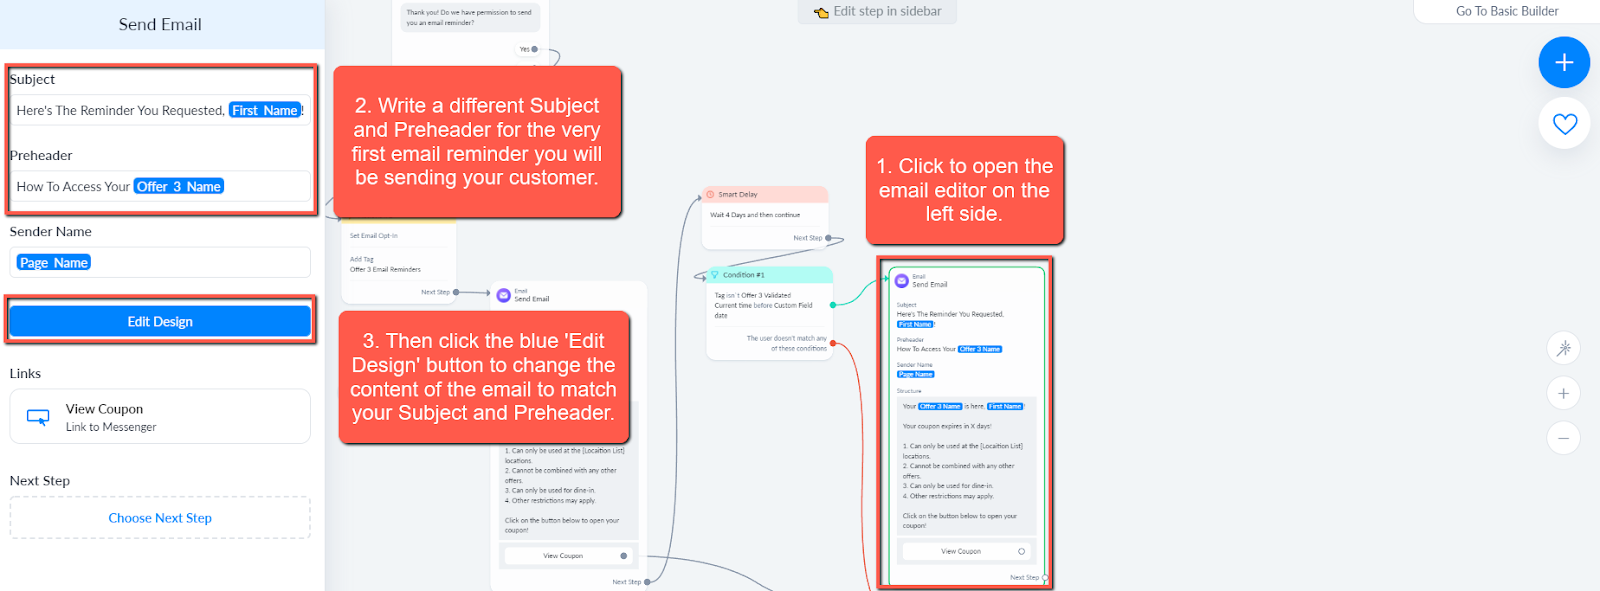
Then click the blue ‘Edit Design’ button to change the content of the email to match your Subject and Preheader. Once you do, you will see the Email Builder page.
In this Email Builder page, we want to keep the same layout as we had before, but just change the greeting text and some other language so that it is consistent with the subject and timing of this email reminder.
We can change the greeting to be the same text as the Subject. We can also add some context to the offer details that makes this email more relevant such as ‘Your offer expires in 10 days!’

Close the Email Builder when you are done editing.
The last thing you need to do for this email is to connect the ‘View Coupon’ button to the action that starts the flow for your ‘{Offer Name} Coupon.’ Click and hold the open gray circle next to ‘View Coupon’ then drag and release on top of the Start Flow action. If you did it correctly, you should see that the two are connected now.
Now that we have the first email reminder set up in this flow, let’s finish up the rest of the email reminder sequence. We’re going to make it very easy for creating emails just like how we did for this second email.
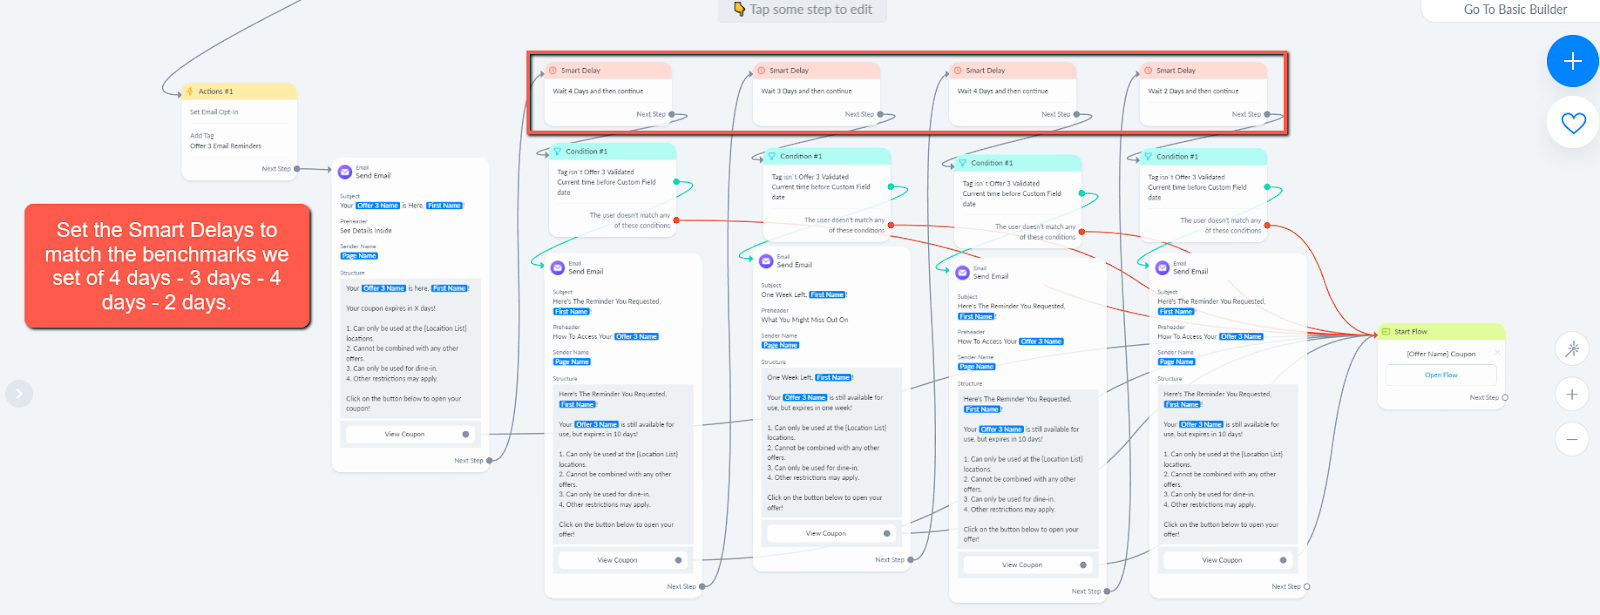
This time, instead of copying and pasting just the email, we are going to copy and paste the Smart Delay and Condition steps before the email along with the email. This will give us the structure we need to create a sequence of emails that is sent every 3-4 days until the user’s offer is validated or expired.
In your flow, select the Smart Delay, Condition and Send Email steps together by holding Ctrl on your keyboard while clicking each one of the steps.

Then copy and paste the selection at least 3 more times so we can fulfill the sending frequency of 3-4 days up to 14 days. After that, connect each email to the next Smart Delay step. Then connect all the red circles in the condition boxes to the ‘{Offer Name} Coupon’ flow. Also connect the ‘View Coupon’ buttons within each email to the same flow.

Now you have a full email sequence that will fulfill 14 days of emails every 3-4 days.
Let’s make some edits to the remaining 3 emails so that they are relevant to the time we send them and relevant within the sequence as well.
Let’s also set the Smart Delays so that they are consistent with our messaging.
For example, all current Smart Delays show 4 days. We need to adjust some of them to be 3 days and then edit the text in the email to reflect how many days left they have to use the offer.
Let’s first plan out timing benchmarks we want then we can set the Smart Delays and messaging afterwards.
My timing usually works out like thing – 14 days – 10 days – 7 days (1 week) – 3 days – last day
So there are a total of 5 emails, which we already have placed. Based on those benchmarks, the Smart Delays should be set at 4 days – 3 days – 4 days – 2 days.
Let’s go ahead and set those Smart Delays to match my benchmarks.
With those newly set Smart Delays, let’s then adjust our messaging to be relevant to each one.
The first two emails we set should already be relevant. Let’s work on the last 3 so let’s edit the 3rd email right now.
The third email should tell your customer that they only have a week left.
The fourth email should tell your customer that they only have 3 days left.
The fifth email should tell your customer that ‘Today is the last day!’ to use the offer.
Once you have your emails relevant to their place in the sequence and time that they are sent, then we are ready to finalize these email reminders!
Click on Publish on the top right of the screen to publish this flow.
Conclusion
Now, we want to create SMS (text message to phone) Reminders for your customers. Because we already created a reminder sequence, you will see that the next step is going to be very easy (more copy/paste!)
Now, anytime someone requests to get email reminders, you will be able to get that person’s email address and send them a sequence of reminder emails relative to when they signed up.
