If you use WooCommerce to sell your food and beverages online…
You could be missing out on higher order volume if you aren’t using coupons.
Today I am going to show you how you can create a coupon in WooCommerce.
Make Sure You Have Coupons Enabled
First, you want to log in to your WordPress Dashboard.
After you log in, you want to make sure you have Coupons enabled in WooCommerce.
If you don’t have coupons enabled, your WooCommerce menu won’t have the Coupons option and it will look like this:
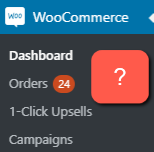
You won’t see the Coupons option there.
To make sure you have coupons enabled in WooCommerce, go to WooCommerce > Settings and click on the General Tab.
Scroll down until you see the checkbox that says “Enable the user of coupon codes”
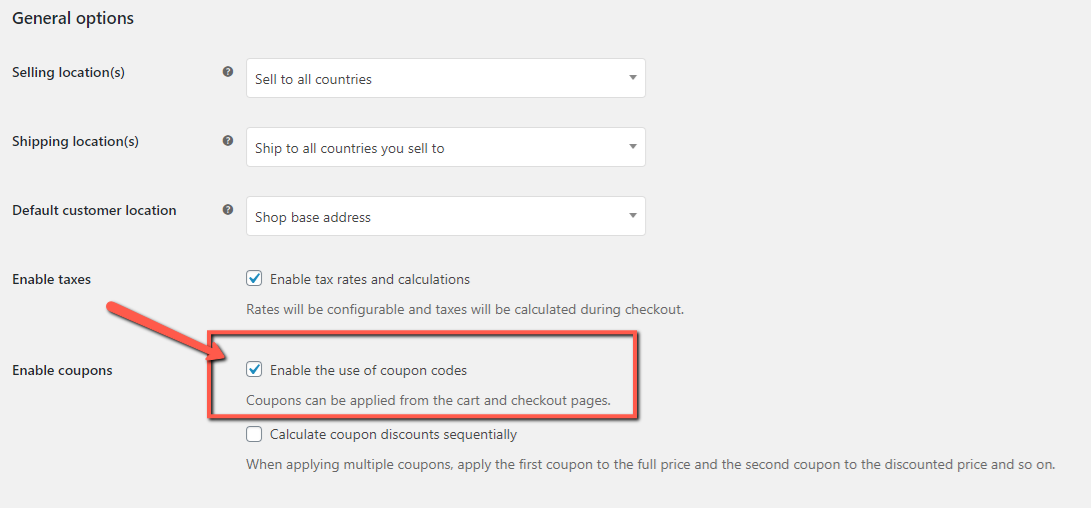
Then check the checkbox and save these settings.
After you save the settings, you should be able to see the Coupons option available in your WooCommerce menu now.

Go ahead and click on that link.
Now you will see the option to create a coupon in WooCommerce.
Create Your First Coupon
Now you can create your first coupon if you haven’t already.
If you haven’t, you will see your screen look like this.

If so, go ahead and click on ‘Create your first coupon.”
There are a couple of fields that we must fill in, in order to make sure the coupon can be distributed to customers and applicable to their purchase when they are checking out.
First, you want to make sure that you define what your coupon code is. This will be the code that your customers enter in the coupon field when they are checking out:

If you have no idea what to put as your coupon code, you can click on the “Generate coupon code” button to generate a random coupon code.
Next, you want to choose from 3 different kinds of discount types. You can have either a:
- Percentage discount
- Fixed cart discount
- Fixed product discount
Then you can put the amount of percentage or fixed price discount just below it.
After that, you can choose the expiration date of the coupon.
If you are strategic with choosing your expiration date, you can see a big spike of coupon usage on the expiration date. You will see more coupon usage on the day that you first announce and distribute you coupon, and if you make an announcement on the expiration day of the coupon.
On the next tab, you can choose conditional restrictions for the coupon.

You can choose minimum or maximum spend. This is useful if you have a coupon such as $25 off $75. Then you would set the minimum spend at $75.
After that,l you can choose if this coupon can be stacked with other coupons or if it cannot be applied to specific items.
Then you can choose which products to include and exclude with this coupon.
Lastly, you can choose who exactly can use the coupon code by adding their email address.
For example, if you have a family and friends coupon that you only want family and friends to be able to use, you should put the emails of all of your family and friends here.
There could be a scenario where you tell your family and friends about the coupon made specifically for them, but that coupon code leaking to the public.
So it’s best if you restrict it to the people you know and want to use the coupon.
The last part of constructing your coupon is to set usage limits:

Here, you can set the total amount of uses per coupon. If you only want it used 100 times, then you would put 100 here.
Then you can make it only applicable to up to however many items in the cart. For example, if you set a minimum spend of $75 but they have 10 items in the cart and you want them to spend $75 with only 5 items in cart, you would change this setting.
Lastly, you can change the amount of times it can be used per person. If you only want the coupon to be used once person, then you can set this to 1.
After you finish setting these settings, you can hit Publish on the right side:

Once you do, you can go to your own checkout page and check to see if the coupon works:
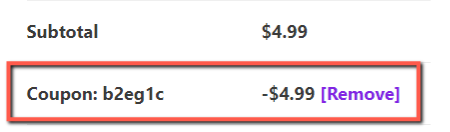
You can see that I entered the coupon code and it worked flawlessly.
Now that you know how to create a coupon in your WooCommerce Food Online Ordering Site, what coupon will you create to help drive higher volume of sales?
Comment below with the ideas that you have.
