There’s this one item that you have so much of, and it’s not being sold fast enough.
It’s also taking up a lot of space and you just want to get rid of it.
But you don’t want to donate it. You know you have something to gain out of it.
How do you liquidate it fast?
Today I am going to show you how we sold at least one wine bottle every four customers that ordered from us.
So how do you put an offer in front of someone after they bought?
There is software that lets you do this. The software will differ depending on which selling platform you use.
Even in retail, you can see that Disney puts merchandise in front of you just after you rode a ride.
I use WooCommerce and WordPress. There is a software that can give you the ability to offer anything after the customer clicks Purchase.
It is called Upstroke by WooFunnels.
It’s the same software I used to get 26.18% of the people who purchase from me, to purchase a wine bottle after they already completed the purchase.

I’m going to show you how to do the same with any inventory you want to liquidate, while also increasing average order value:
First, Install & Activate Upstroke in your WooCommerce.
Then get your license key from your BuildWooFunnels account, then copy and paste it in your WordPress Dashboard.
Now, on the left side WordPress panel, hover over WooFunnels and select One Click Upsells. Then click on Add New to start a new One Click Upsell.
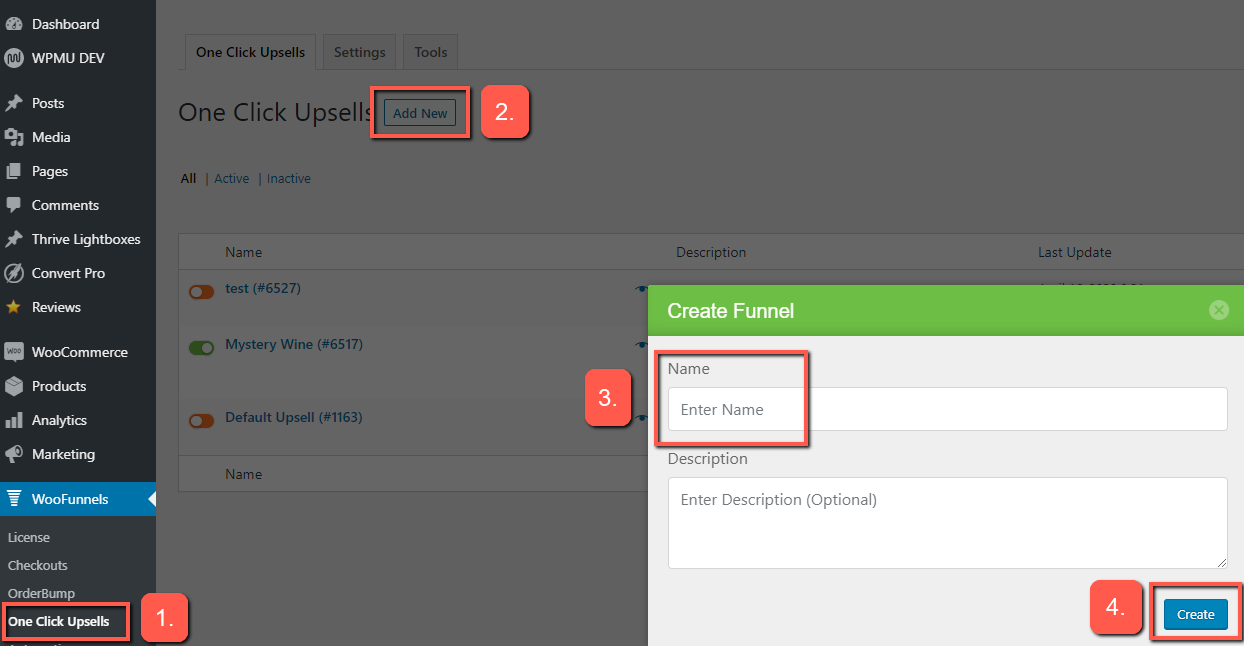
You will be prompted to name your funnel and add a description. You don’t have to add a description, but you should name the funnel the product that you plan on offering.
Then you will go straight into building your post-purchase upsell.
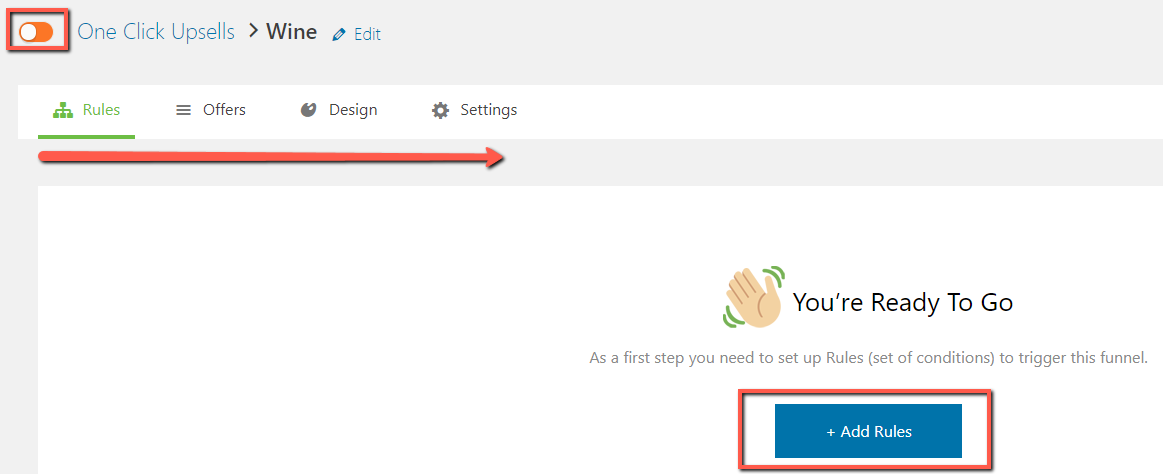
Who Should See Your Post-Purchase Offer?
The building process goes from left to right. There’s a tick box on the top left to let you know if the offer is turned on or off. The first step is to Add Rules.
When you add rules to your offer, you are telling the software to only show your offer to customers in specific situations. For example, you can choose to show your offer based on the products that the customer just purchased. You can also show your offer based on the customer’s purchase history and activity.
You can even create combinations of these rules by adding AND or OR rules.
When you use AND, that means you want the offer to show to people who fall within the combination of rules. When you use OR, that means you want the offer to show to people who are either of the rules.
Choosing rules really helps you target the right people for the offer, and avoid making any of your customers angry.
For example, since I was offering Wine at a discounted rate, I didn’t want to target any people that had a full-priced wine on their order. I think that would really upset the customer.
On the other hand, if a customer’s order history contained a full-priced wine from a previous order, I would show this offer specifically to them because I know that they are a wine drinker.
I will probably scale this to cocktails and other alcoholic beverages as well.
When you are done choosing your rules, click on Save & Proceed which will take us to the Offer selection section.
Building Your Offer
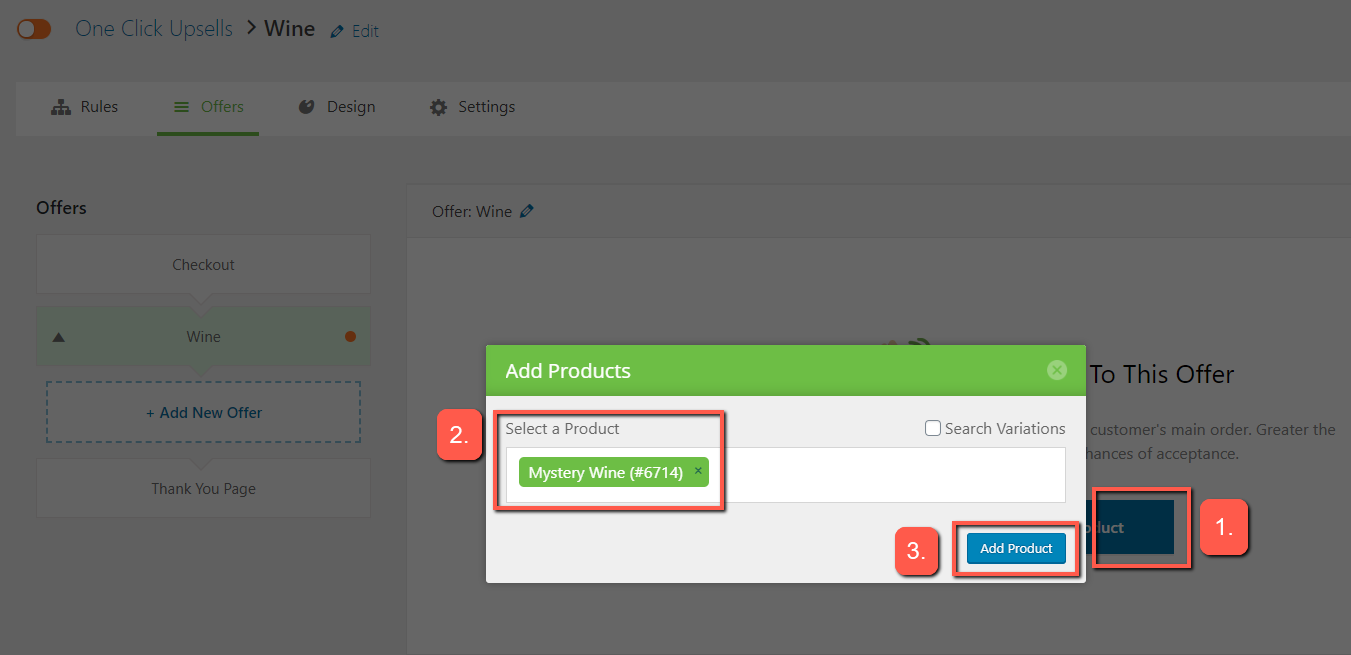
Now that you chose exactly who you want to show your offer to, now it’s time to choose the products you want to show them after they have already purchased.
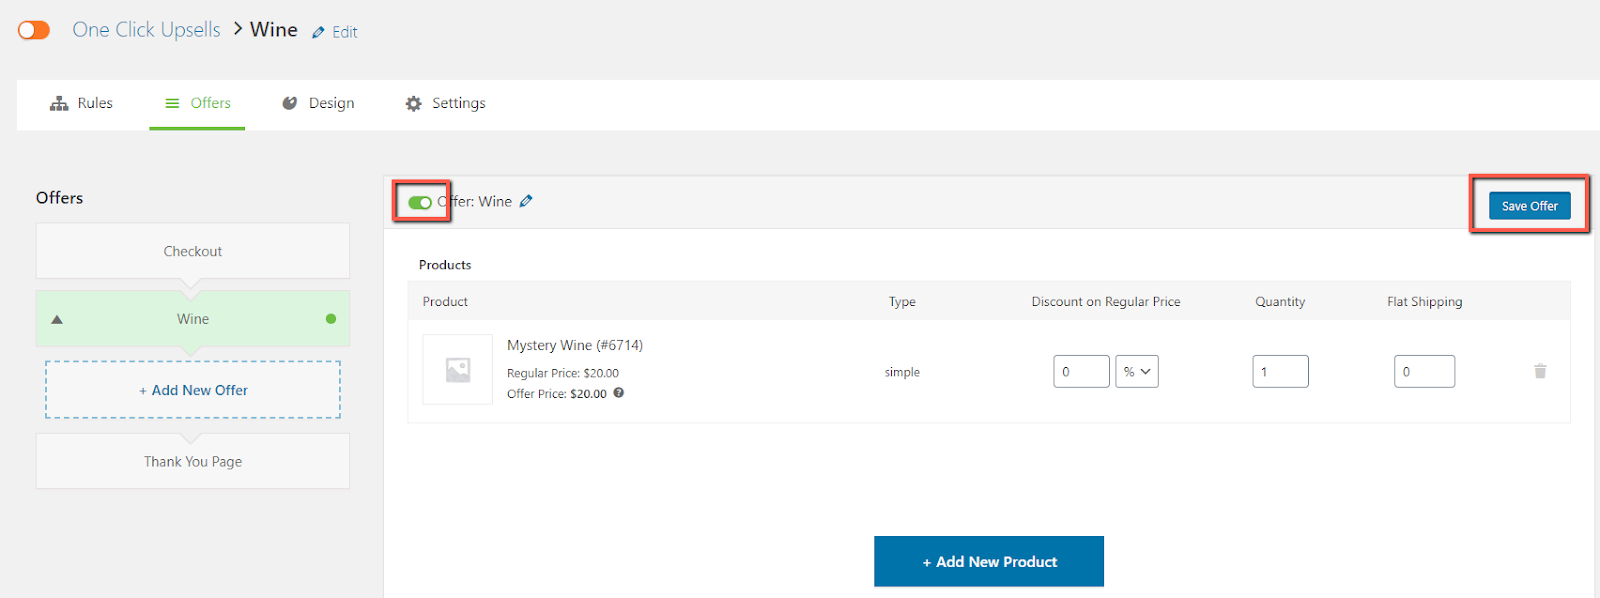
To add your first products, click on the +Add New Offer button on the left side of the screen, name your offer, then click Add Offer:

I usually like to name the offer the name of the product that I am going to show. So in my case, I would name the offer “Wine.”
Now, you can add a product to your offer by searching for your product in the field below:
After you add your product, you can offer a discount, put a predetermined quantity and also add the price for shipping for this product.
Also, depending on which version of Upstroke you bought, you might have the option to add additional products to this offer.

This is useful in the case where you want to offer different variations of the same product in the offer or if you want to offer different quantities.
For example, I can offer 1 wine bottle for $20, but 2 wine bottles for $35, giving my customers even more of a discount.

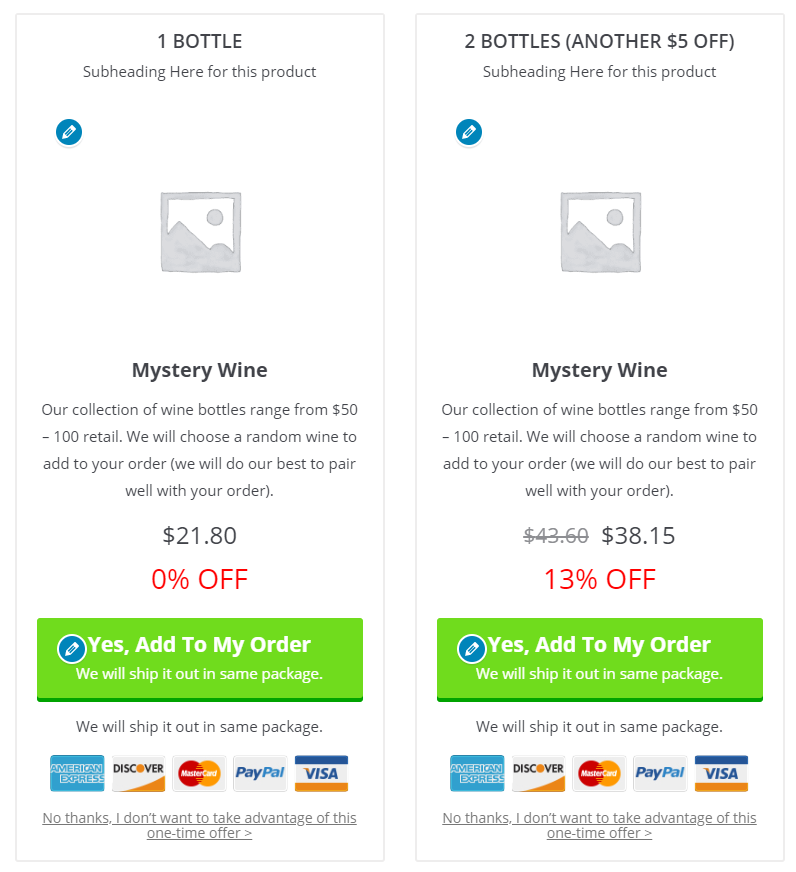
The two bottle offer setting would look like this:

Just a pro tip, you don’t want to add more than 3 options here. Giving the customer too many choices creates uncertainty, which can just make them not consider the offer at all.
After adding your product(s), you can choose the options for this offer below:

At this point, since you only have one offer, you should keep both Terminate Funnel checkboxes checked.
From here, you can turn the offer on and save the offer:
After this, you can actually add another offer to show after this one, based on if they accepted or rejected this offer.
I would recommend testing this offer first before adding other offers.
If you see that a lot of people are rejecting the offer, but still want to keep the offer, then you can add an offer after this first offer that you built.
For example, say someone rejected this wine bottle. Maybe you want to offer them a cocktail next.
Then you can go to the top left and click on +Add New Offer to add your cocktail offer.
How To Present Your Post-Purchase Offer
Next, we are going to design the page that shows your offer. Don’t worry, you don’t need a designer for this because Upstroke automatically has templates you can use. I personally just picked a template, reviewed the content and moved on.
If you have a designer and want to design a custom page, they have an option for you to do that too (highlighted in Yellow below). You can use custom coding or any Page Builder (Thrive Architect, Elementor) to create a custom page. Again, this is just an option. I personally just use their templates in the Customizer option (highlighted in Red below).

When you hover over either template, you will see an eyeball symbol popup. You can click on it to preview the page.
After previewing each page, you can choose which one you want to apply. I chose the first page.
After choosing your page, you can preview the page with your specific product showing or customize the page further.

The page template they give you actually has a lot more information that you really need, so I removed a lot of it. To follow what I removed, click on Customize:
The first thing you want to do in here is add your Logo by clicking on the pencil icon next to the Logo block:

Once you do, the sidebar on the left will change and prompt you to add your logo. You can click on the Select image button:

I left all of the other logo options as the default options because I thought my logo looked fine after selecting my logo image.
Then, on the left sidebar, I click on the back button until I got to the main menu and selected Layout & Sections:

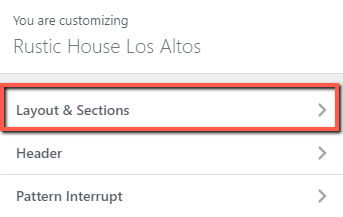
This is where you can choose what sections show on the web page.
As you scroll down this templated page, you can see that there is a lot of information you don’t really need. I personally decided to discard the following sections:

After doing that, I feel like the page looked a lot cleaner and let the customer focus on accepting the offer or not.
When you are done customizing this page to your liking, click on Publish in the top left corner. After the page is done, click on the X in the top left corner and you will return to the One Click Upsells dashboard.
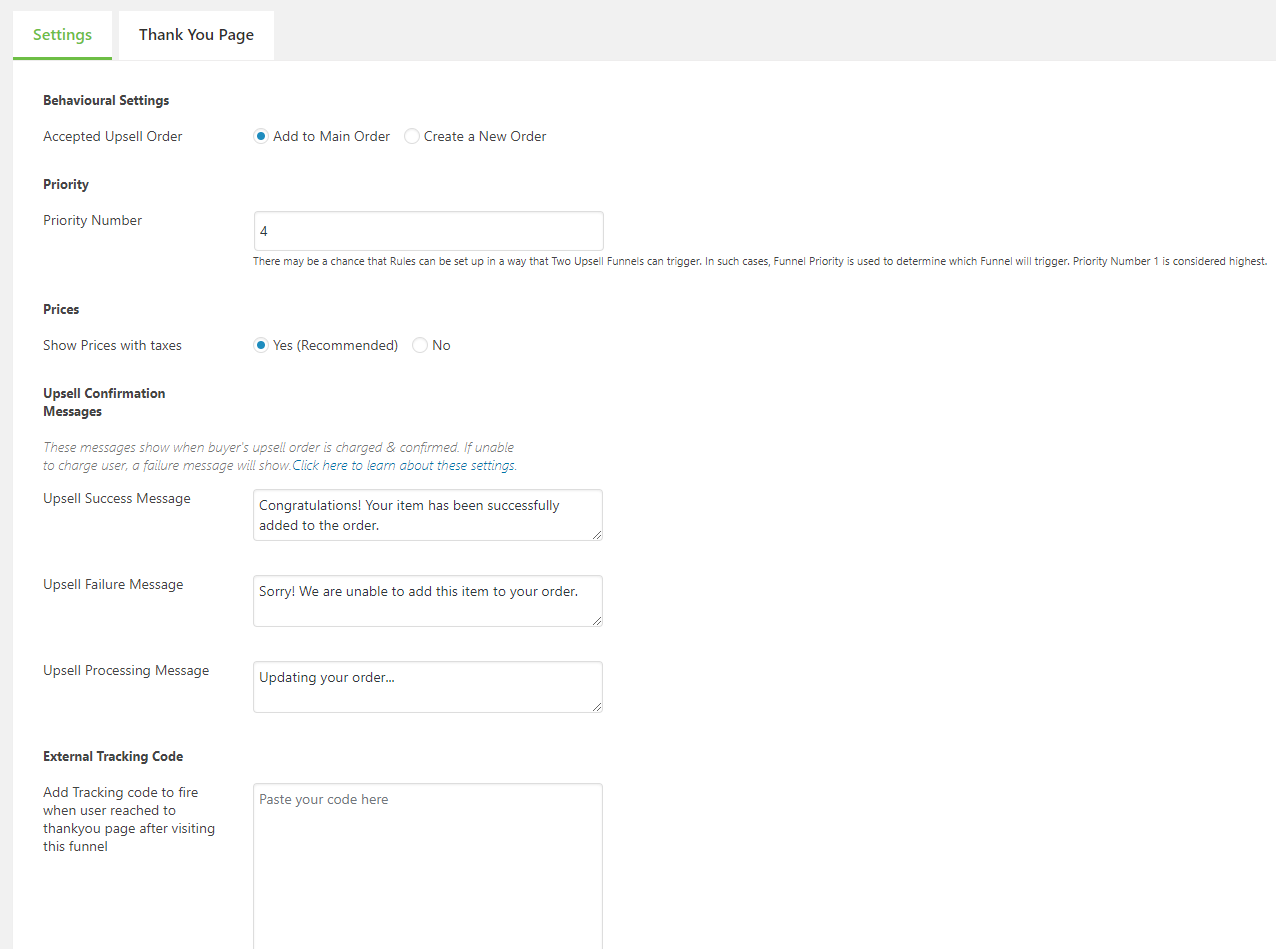
Extra Settings
Just before finishing setting up your post-purchase upsell, there are some settings you can tweak if need be. You can choose to add this upsell to the original order or create a new order out of it. I chose to add the upsell to the main order.
If you continue to make more post-purchase upsells, some rules from all of your upsells may apply to the same offer, so it’s best if you choose the priority of this specific offer and your other offers.
All of the other options are straightforward.
Now, you are fully set up to liquidate the item you put in your offer!
What item are you going to liquidate first?
Comment below and let’s share ideas!
